
Too Long? Read This First
- WhatsApp Status Ads are full-screen and vertical ads that appear in your WhatsApp Updates tab to let people tap and reach out to the brand with just a tap.
- With over 500 million daily status viewers, these ads put your brand where people usually check and have click-through rates as high as 45-60%.
- You can run WhatsApp status ads using the Meta Ads Manager with just a few simple steps mentioned in this blog.
- WhatsApp status ads cost you much less per lead than Click-to-WhatsApp ads on Facebook or Instagram without any drop-off.
- For handling all the leads that these ads bring, the WhatsApp Business API helps automate replies, respond instantly, and keep conversations in a unified inbox.
- With Getgabs, brands can easily run and manage WhatsApp Status ads and auto-capture leads, send instant replies, and track campaigns from one dashboard.
WhatsApp Status ads put your brand in front of over 1.5 billion people who check WhatsApp Status every day. And that’s not a statistic. One of those people could be your next customer.
These vertical ads put your brand directly between the daily updates of your target audience. That means higher attention and faster conversation with people who are already warm to your offer. One tap on your ad and they can directly chat with your business instantly. No landing pages or drop-offs. Just real leads in real time.
However, its success mainly requires professional tools in Meta Ads Manager. And for those who want to grow, the WhatsApp Business API is the best option for teams who want automation, speed, and no lost leads.
In this guide, we will take you through a step-by-step guide to run WhatsApp ads on Status and start seeing the results.
What Are WhatsApp Status Ads?
WhatsApp Status Ads are full-screen and vertical advertisements that display within the Updates tab of WhatsApp. Yes, you guessed it right. It is the same place where your contacts share their 24-hour photos and video updates.
They might look and feel similar to Instagram stories ads. But both are quite different. Why? Rather than sending people to the website, it lets customers reach out to your brand by just tapping. Here’s how it appears and what makes it stand out:
- Full-screen format: 1080 x 1920px with zero distractions.
- Instant conversation: Single tap opens a direct WhatsApp live chat with your brand.
- Short and punchy: Image or video (up to 30 seconds max)
- Purpose: get discovered, boost engagement, and turn chat into sales.
- Launch from Meta Ads Manager: Just select “Message” objective and go live instantly.
- Completely private: Personal chats, calls, and messages are never impacted.
In simple terms, WhatsApp status ads fill the gap between browsing and buying and offer a personal way to grow your brand in 2026.
Why Are WhatsApp Status Ads A Big Deal for Businesses?
Where most ads get scrolled and pass, WhatsApp Status ads get tapped. They have become a “cheat code” for brands. Here’s why this format is a go-to way for your marketing ROI:
- Massive Attention in a Personal Space: With 500 million people viewing WhatsApp Status updates daily, it is a full-screen space where users are already engaged with updates from people they trust. That means your ads do not feel like intimidation but more natural.
- Zero Landing Page Friction: Unlike Facebook or Google ads, Meta Status ads skip the middleman entirely. It cuts off those slow-loading websites and long forms and lets the user directly chat with the brand that is ready to convert.
- Unmatched Engagement Rates: WhatsApp promotional content in chat often sees a click-through rate between 45% to 60%, which means you’re generating a real conversation.
- Lower Cost Per Conversation: As here you keep the users inside the Meta ecosystem, the cost per lead is often lower than traditional “click-to-web” ads. Just better results in less spending.
- Works for Every Type of Business: Local shops, D2C brands, e-commerce stores, and even service providers; it works for all. Local shops can target nearby customers, D2C brands and online stores can promote their products and close deals.
WhatsApp Status Ads vs Click-to-WhatsApp Ads: What’s the Difference?
While both formats initiate direct WhatsApp chat, the main difference lies in where customers see it. Here’s the side-by-side between Click-to-WhatsApp ads and WhatsApp Status Ads:
| Feature | Click-to-WhatsApp Ads (Facebook/Instagram/Search Engine) | WhatsApp Status Ads |
| Placement | Search Engine, Facebook/Instagram Feed, Stories, Reels | WhatsApp Updates Tab |
| Ad Format | Banner, Carousel, Feed Post | Full-Screen Vertical (9:16) |
| User Action | Click ad → redirected to WhatsApp chat | Tap ad → chat opens instantly inside WhatsApp |
| Look & Feel | Feels like a regular social media ad | Native, personal, and conversational |
| Lead Quality | Cold to warm traffic | Warm, high-intent conversations |
| Response Speed | Can take time after redirect | Instant without extra steps |
| Drop-Off Risk | Moderate and redirect can lose users | Very low and seamless experience |
| Best For | Brand awareness and lead generation | Direct sales and instant lead capture |
| Customer Trust | Moderate | High (feels like a personal message) |
| Cost Per Lead | Higher on average | Lower (more targeted and personal) |
Step-by-Step: How to Run WhatsApp Ads
The following detailed steps guide you through creating a WhatsApp Status ad campaign using Meta Ads Manager.
Step 1: Open Ads Manager
- Go To Meta Ads Manager
- Log in with your Facebook business account
- Access your dashboard
- Confirm your ad account is active
- Check that your Facebook page is connected
- Verify payment method is added
- Make sure business manager access is enabled
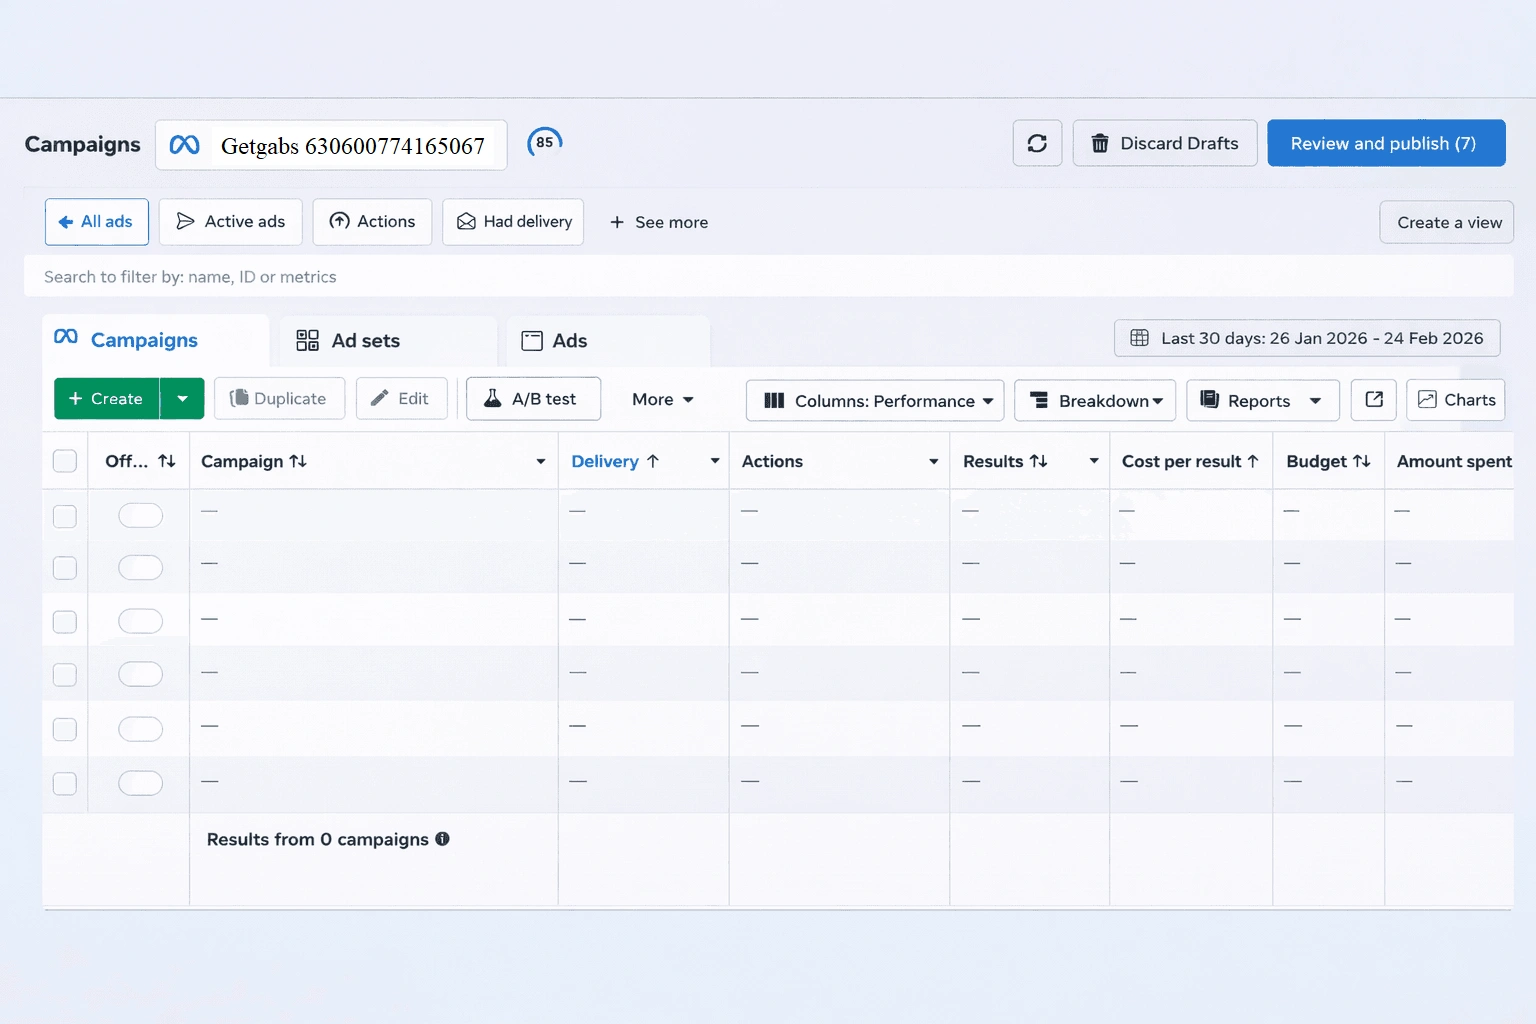
Step 2: Click ‘Create Campaign’
- Start a new campaign
- Click the ‘Create’ button
- Choose manual setup
- Move to objective selection

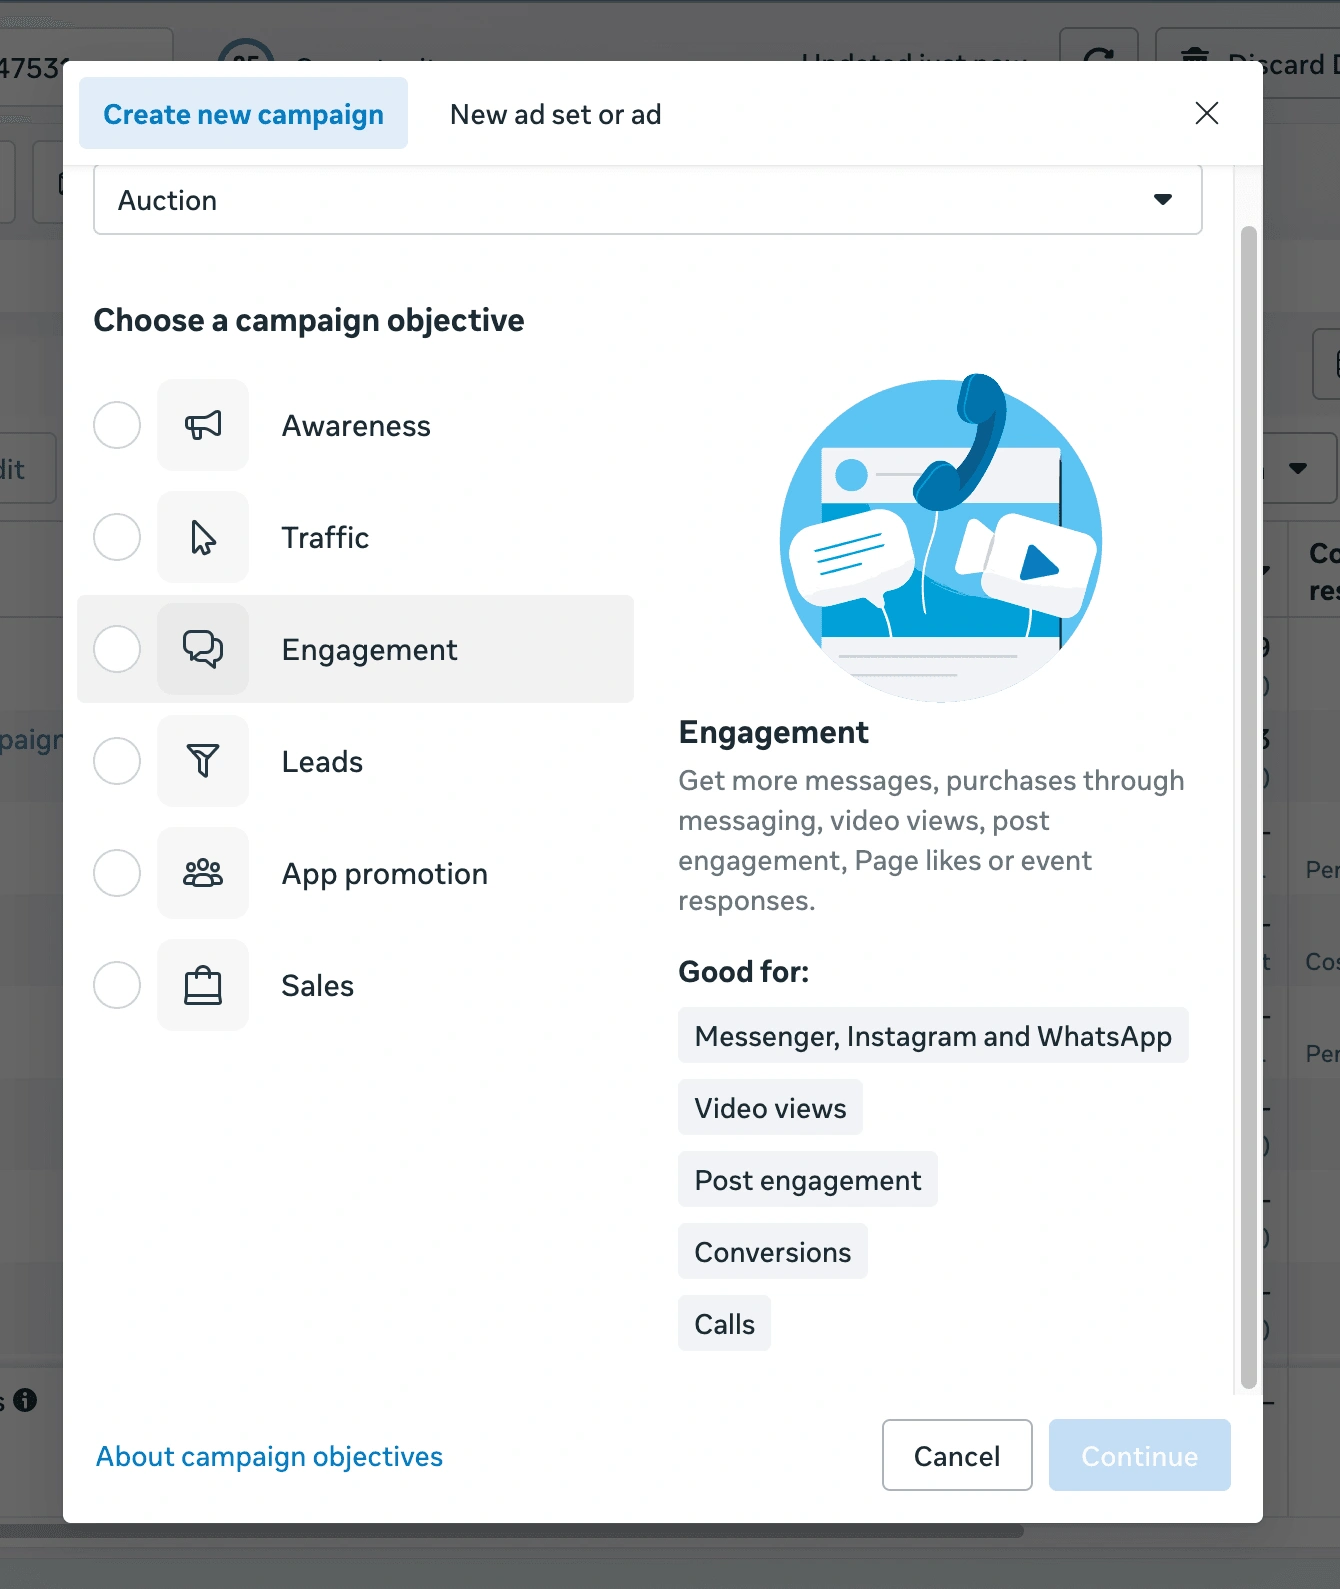
Step 3: Choose Campaign Objective
- Select the correct goal
- Choose messages
- This optimises for conversions
- Avoid traffic and engagement objectives
- Click ‘continue’
Step 4: Select WhatsApp as the Message Destination
- Choose where messages should go
- Select WhatsApp
- Ensure WhatsApp is selected as your only messaging platform before continuing.
- Confirm your WhatsApp business account is visible

Step 5: Connect WhatsApp Number
- If not already connected
- Click connect
- Enter your WhatsApp business number
- Verify via OTP
- Double-check the correct number is linked
- Save connection
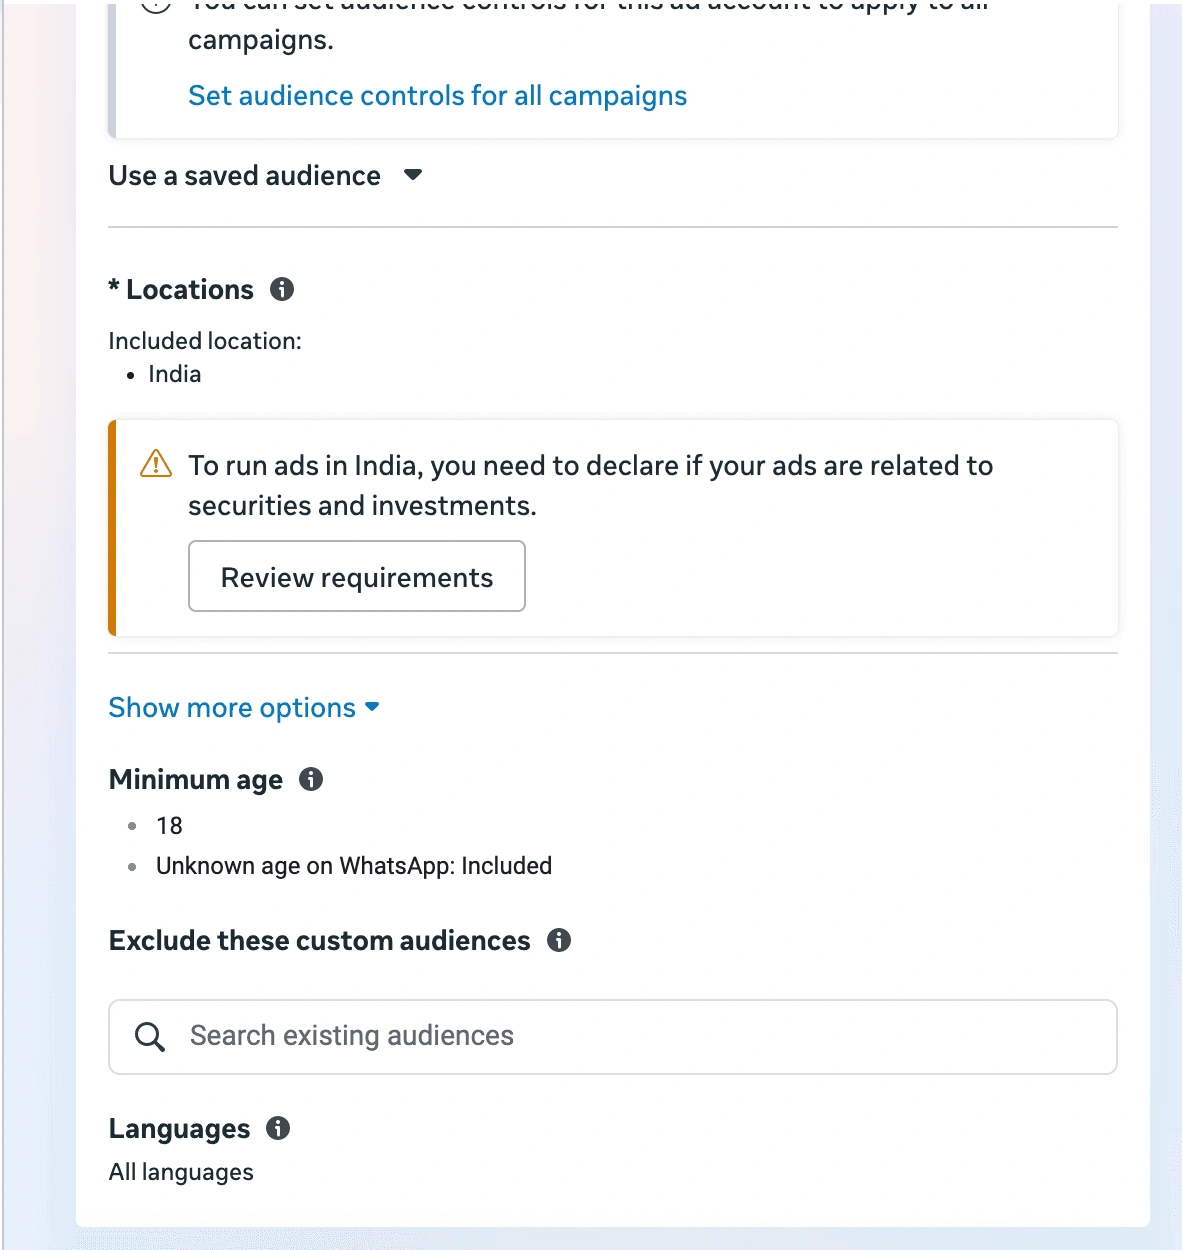
Step 6: Define Audience Targeting
- Target the right people
- Select location (city, region, or country)
- Choose age range
- Select gender (if needed)
- Add interest-based targeting
- Add behaviours filters
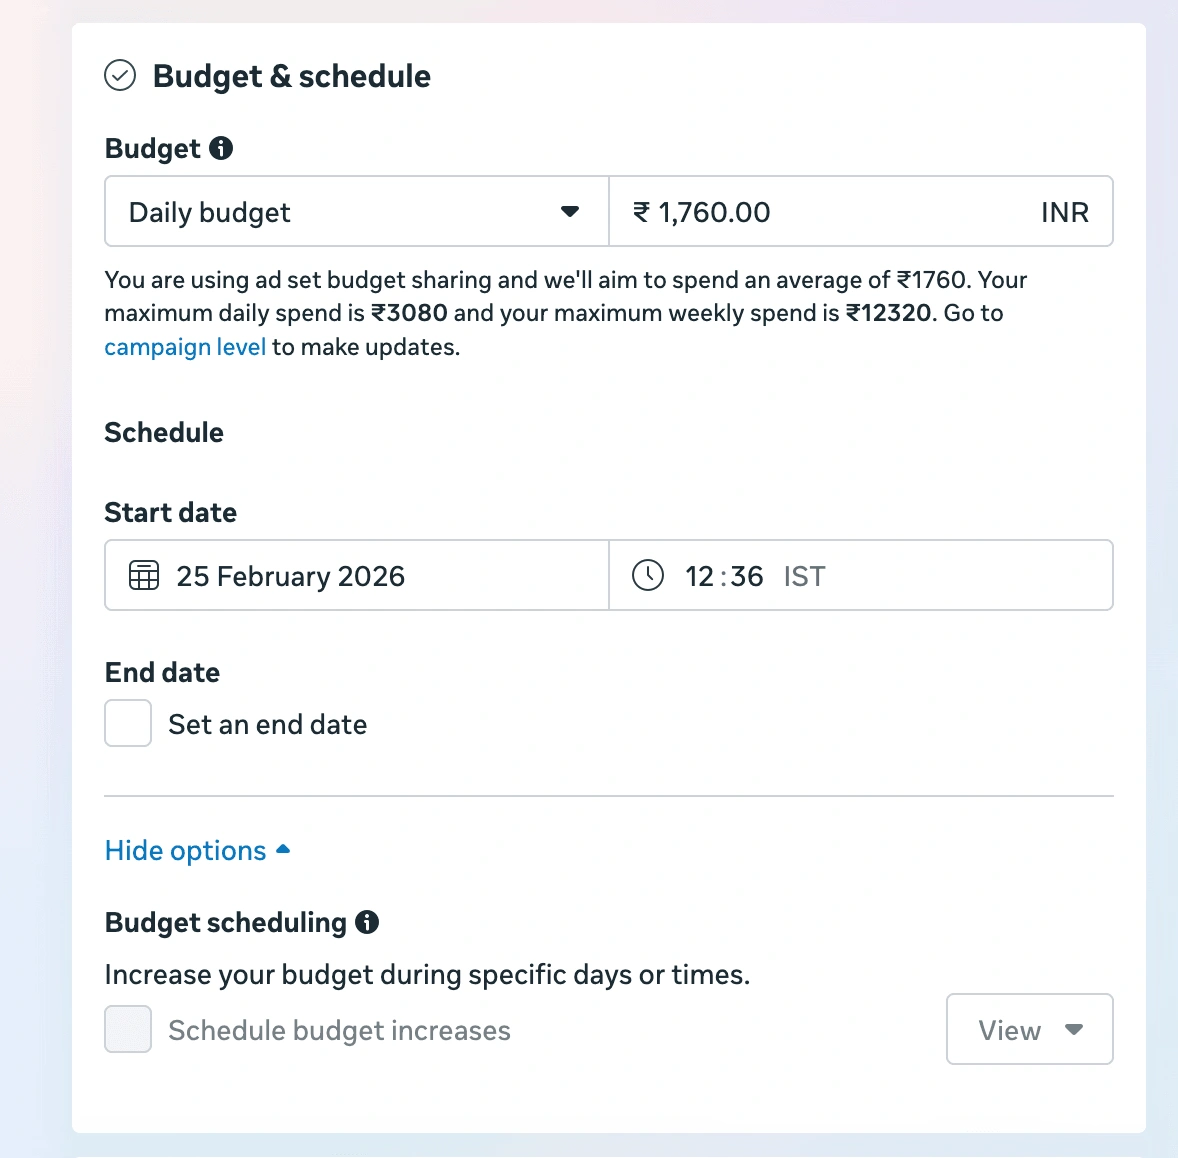
Step 7: Set Budget & Schedule
- Choose a daily or a lifetime budget
- Start with a small test budget
- Set campaign start date
- End date (optional)
- Let it run for at least 5 days
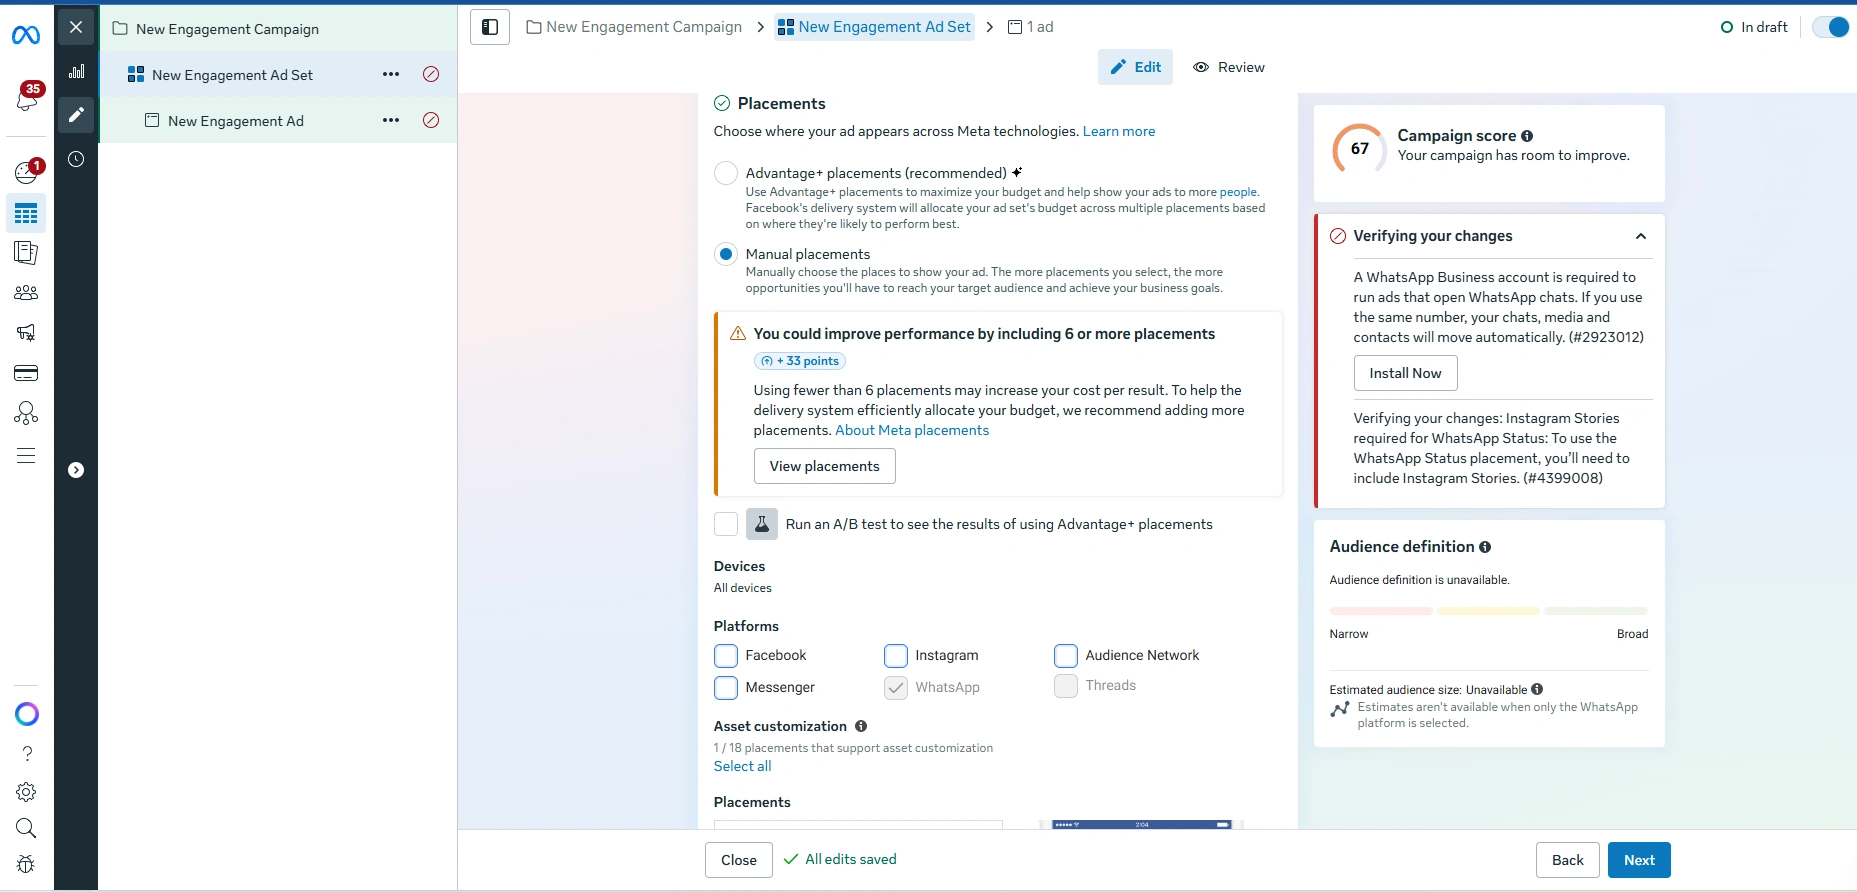
Step 8: Select WhatsApp Status Placement
- Go to Placements
- Select manual placements
- Select WhatsApp status
- Instagram stories (optional)
- Facebook stories (optional)
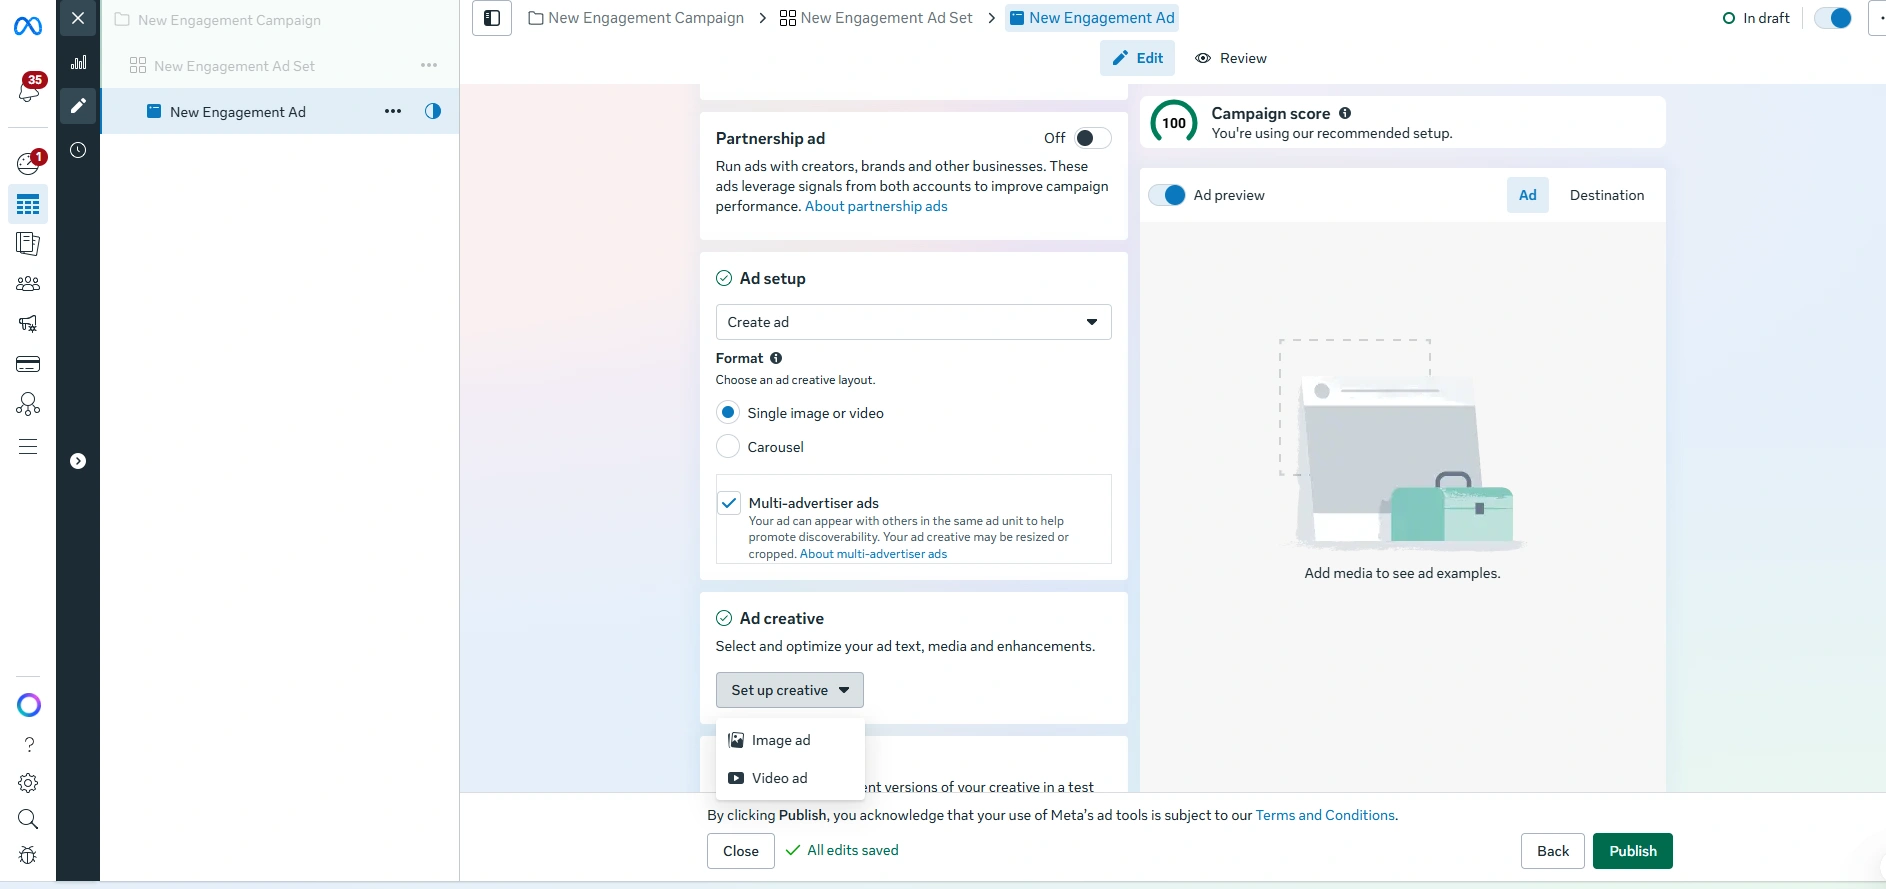
Step 9: Upload Your Ad Creative
- Go to the ad level
- Upload your image or video (1080*1920)
- Add text and a CTA.
- Publish ad
Pro-Tip: Run WhatsApp Status ads with a WhatsApp Business API number to automate customer chats and manage through shared team inbox.
How Does Getgabs Help You Run WhatsApp Status Ads?
A tap on your ad is just the beginning. Platforms like Getgabs help you turn each Status ad conversation into a real buyer. Here’s how it supports your WhatsApp Status ad campaigns:
- 24/7 auto-replies: Getgabs WhatsApp chatbot greets users instantly, answers FAQs, and routes complex queries to a live agent.
- Behavior Retargeting: Segment your contacts list based on their behavior, clicks, or drop-offs to send them tailored follow-up.
- Shared team inbox: Enable multiple team members to manage leads with a single dashboard.
- Instant Lead Capture: Names, numbers, and chat details are saved the moment a conversation starts to easily follow up with any manual efforts.
- Analytics & reporting: Track lead quality, response rates, and conversion rates to see what’s working for you and what’s not.
- Seamless Integration: Sync leads directly with your existing CRM, Shopify, HubSpot, and other tools to keep customer data in a single place.
- Broadcast re-engagement: Re-engage with leads who didn’t convert first with targeted WhatsApp broadcasts at scale.
- One dashboard for everything: Run and manage both Click-to-WhatsApp ads and Status ads without switching platforms.
In short, Meta gets the tap, and Getgabs WhatsApp Business API ensures the tap becomes a customer.
How to Measure Your WhatsApp Status Ad Performance?
Running a WhatsApp ad in Status is just half the walk. Now that you are aware of how to run ads on WhatsApp Status, it is important to track results to ensure every rupee is well spent.
Here are the key metrics you need to monitor
- Conversations Started: See how many people tapped your ad and started a chat. It is your main ROI indicator.
- Click-Through Rate: It tells how engaging your ad is. A high CTR means your videos and images are successfully grabbing attention.
- Cost Per Conversation: How effectively is your budget turning into real leads?
- Message Response Rate: This measures the quality of your leads. It means how relevant and high-quality your incoming leads are.
You can easily find all these metrics inside Meta Ads Manager under your campaign dashboard. But what if you are seeing the number but not the desired result? Here’s what you can do:
- Pause the creative that has a high cost per conversation or low CTR.
- Scale the ads that are generating conversations at a lower cost.
- Test out new creatives every two weeks.
Mistakes to Avoid When Running WhatsApp Status Ads
Setting up your WhatsApp Status ad is easy. However, a few small errors can burn your budget. Avoid these common mistakes to ensure your campaigns deliver the results you want:
- Incorrect Ad Size: WhatsApp Status is a full-screen and vertical format. If the size of your ad is not 1080 x 1920, it may appear cropped or blurred. Make sure that your design remains vertical.
- Quitting Too Early: Meta’s algorithm requires at least 5-7 days to learn who your best customers are. That’s why pausing the ad after 2-3 days is a huge mistake. Be patient and let the data settle.
- Missing the 3-Second Hook: WhatsApp Status is generally viewed by people instantly. Therefore, if your brand, offer, and value proposition are not clear in the first three seconds, you have just lost them. So begin with your strongest points.
- Targeting Everyone: Don’t try to reach everyone at once. Instead, test two or three audience segments with different age groups or interests separately. This data will help you see who is clicking so you can spend your budget wisely and where it works best.
For businesses that want to avoid this hassle, using the WhatsApp Business API is the best way to handle new leads automatically and ensure a seamless process. Here’s a breakdown of the best WhatsApp API providers to help you get started with the right one.
Conclusion
You now have everything you need to run ads on WhatsApp Status and launch them instantly. They are no longer just an option for your marketing.
It is a direct way to reach your customers in 2026. Simply by placing your brand inside the personal updates of over 500 million daily viewers, you can bypass the noise of crowded social feeds and land directly where real-time chat happens. This vertical format, Status ads offer a level of engagement that traditional ads fail to provide.
The secret to winning is simple: use high-quality visuals, hook your audience in the first 3 seconds, and let the Meta algorithm optimize your delivery for at least a week. But getting a chat is only half of the battle.
What happens after someone taps on your ad matters as well. Slow responses and missed conversations often lead to lost sales. That is the reality of running ads without the right tools.
That’s exactly where platforms like Getgabs come to help you manage every incoming WhatsApp interaction at scale using smart automation, instant replies, and a shared team inbox to keep the lead warm.


